Showing posts with label foodie friday. Show all posts

Friday, December 11, 2015

Rudolph the red-nosed reindeer cupcakes

One of my favorite things to do during the holiday season is baking-- better yet, decorating. This wasn't always the case. When I worked at a bakery, the holidays meant early mornings, long hours, lines of customers, and never-ending racks of cakes and pastries to decorate. Now, I happy to satisfy my creative interests in the kitchen at my leisure. Here is one of my favorite cupcake creations that is easy, fun and adorable. Who doesn't love Rudolph?
 

Use your favorite chocolate cupcake recipe and decorate as follows...
 
Supplies Needed:
  • Chocolate Frosting
  • Vanilla Buttercream Frosting
  • Red Gum Drops
  • Red Food Coloring
  • Chocolate Chips
  • Pretzels
  • 2 Ziploc bags (or 2 piping bags
What to do:
  • Frost cupcakes with chocolate frosting.
  • Fill one Ziploc or piping bag with white buttercream frosting.
  • Add the food coloring to a separate bowl of frosting to make red frosting.
  • Fill the second frosting bag with the red frosting.
  • If using Ziploc bags, snip a small hole at the bottom corner of each bag.
  • Use the white Ziploc/piping bag to make two dots. Place chocolate chips (top down) onto the white dots.
  • Place a red gum drop in the center of each cupcake.
  • Use the red Ziploc/piping bag to make smiles.
  • Break off pieces of pretzels for the antlers.
  • Share with friends and family and enjoy!
 -Tara
 

Friday, December 4, 2015

Grandma's Crustless Pumpkin Pie

One of Lila's favorite seasonal desserts by far is pumpkin pie. Savoring the spicy pumpkin filling she will usually scoop it all out and leave the crust. If she could just have a bowl pumpkin pie filling, she would be in heaven.


And so, Grandma's Crustless Pumpkin Pie was born! Taste-tested and approved by Lila, this light, simple pie is sure to remain part of the holiday tradition for years to come. From our kitchen to yours. Enjoy!


Ingredients:
  • Butter
  • 3/4 cup granulated sugar
  • 1/2 teaspoon salt
  • 1 3/4 teaspoons of pumpkin pie spice
  • 2 large eggs
  • 1 (15 oz) can of pumpkin
  • 1 (12 oz) can of evaporated milk
Be sure to use organic ingredients!
 

Directions:
  • Preheat oven at 325 degrees.
  • Lightly butter a glass baking dish (preferably a 9 inch round pie dish).
  • Prepare filling by blending all of the ingredients. Scoop and smooth the mixture into the dish.
  • Bake for about an hour or until knife inserted in the center comes out clean.
  • Cool and refrigerate for at least 2 hours (The longer it stays in the fridge the better it gets!)


Friday, September 25, 2015

Finding joy in the everyday in unexpected places

I admit I am not the most playful person, more prone to barreling through my to-do list, accomplishing what I feel I "should" do before leaving room for fun. However, this summer, I found myself prioritizing joy and fun and play. I didn't want to lose all that momentum when the humdrum of school-homework-dinner left very little time for fun.

On the drive home from school, I wondered if Clara and I could find a way to have fun despite the fact that the only time remaining to play in the day was dinner time. We decided to think of something fun to do while eating dinner. My suggestions included a picnic on the living room floor or eating while pretending to be other people and talking with accents. 

Clara had a much longer list which she wrote down as soon as we got home so that we could vote:

1. Watch while eating
2. Play board game.
3. Teach Mama how to play lemonade (a sing-song hand game she learned from friends)
4. Make a tent and eat in it.
5. Watch the sunset (maybe at the beach).
6. Play outside

We don't watch videos while eating as much as Clara would love to, so that was crossed off the list. I have been working with Clara to understand the concept of compromise. I was surprised she didn't really know what it meant when I mentioned the idea a few weeks ago. While discussing how to eat our fun dinner, she suggested we compromise. I was proud of her for remembering the word and being gracious enough to agree to it.

Since her idea of eating in a tent and my idea of having a picnic on the living room floor were somewhat similar, we combined ideas and compromised with a delightful dinner in a makeshift tent on the living room floor. 

This was not the first time we modified our dinner plans to make it a bit more special. When Clara was younger she liked to create her own restaurant at home with handmade menus and meals. We hosted the girls for an American Girl doll tea party (with questionable success) once before in our living room.

Clara dragged chairs into the living room and precariously rested a blanket over them creating a tent-like feel. She insisted we turn out all the lights to make it special. I found a camping lantern that helped to create a more authentic ambience.


Such a simple shift... just moving a few feet away from sitting on the dining room chairs to our living room floor, and yet it made all the difference in making this a special meal.

Clara said, "This is so nice." And then about five minutes later, "This is really nice." And then realizing her repetitions, she clarified, "You know when something is so fun that you just have to keep saying it...this is one of those times. I just can't stop saying how nice this is!"


A small victory. A bit of joy in a hectic day. A reminder that I can keep finding ways to make room for fun, even in every day life.

-Ellyn

Friday, August 14, 2015

To be or not to be... the search for the perfect taboulleh

A local restaurant makes outstanding taboulleh, but it is particularly divine in the hours right after it is made. I head to the back of the restaurant where it's kept in a glass display, hopefully peeking for the tell-tale signs of freshness: a vivid green color, fluffy leaves, and not too much dampness. The restaurant owner caught me intently eyeing the taboulleh the last time I went in and shared a story about a man who recently stopped by the store and balked at the price tag for taboulleh.

"How could you charge $7.95 for a container of parsley?"

The owner held his ground. "That is our price. You can take it or leave it."

The customer left. An hour later the owner got a call from the man's wife apologizing. "I'm so sorry about my husband. He has no idea about how much work goes into taboulleh."

I learned first hand this summer how much work it takes to make this salad. I am a fan of lemon in most anything and this dish has long been one of my favorite salads. I won over my husband with these recipes. He confessed that my taboulleh is "the quintessential summer salad, fresh and delicious!"

Taboulleh is essentially parsley salad with bulgur (a very tiny whole wheat grain), lemon, scallions, mint, and tomatoes. Not a fan of the parsley sprigs that often sit on the side of meals a garnish, I never imagined that parsley taking center stage could feel so nourishing and refreshing. I tried three different versions this summer to make it easier for you to choose which variation you prefer.

TABOULLEH- TAKE ONE

I went with Ina Garten's recipe for my first attempt at taboulleh. This recipe called for a full cup of bulgur wheat and cucumbers. I prepared a generous recipe of this for my niece's birthday, and it was nearly all gone by the end of the evening. I liked the crunch that the cucumbers gave to the salad, but I was striving for a more traditional taste with mostly parsley and mint and not as much bulgur wheat and no cucumbers. I used less kosher salt than this recipe called for and yet it still tasted very salty. We don't traditionally used much kosher salt so maybe I'm not used to the flavor.

It was a lot of work to cut up all the parsley. The recipe suggested 30 minutes of active prep time, but it took me closer to a full hour to chop the parsley and other ingredients.


TABOULLEH- TAKE TWO

I went back to the Internet for a new recipe with less bulgur wheat and more greens and appropriately found this link: "Your Taboulleh Probably Has Too Much Bulgur In It." I knew I had found a kindred spirit when I read the author assert that "The only thing more refreshing than a mouthful of parsley and mint is a mouthful of parsley, mint, and lemon." I one hundred percent agree! I was surprisingly entranced by the accompanying video, never imagining that there were videos dedicated just to parsley preparation.


Despite my best hopes for this taboulleh, it turned out to be my least favorite. I followed the recipe closely except for swapping yellow and red tomatoes for the purely red tomatoes. I missed the bulgur wheat which almost disappeared amidst the parsley. The recipe didn't have the same vibrance of the first one. I tried dicing the tomatoes in a smaller size since that is what I see in more traditional recipes. Clara's friend, Lila, was visiting the day we made this, and she helped expertly cutting the tomatoes in quarters. 

"Can't I just cut them in half instead?" she asked a couple of times.

I encouraged her to keep trying the quarters since that was the variation I wanted to try. In the end, I think Lila was right that cutting the tomatoes in half allows them to give more flavor. Despite my reservations about this version of the taboulleh, Clara and Lila loved it, and both asked for seconds!


TABOULLEH: DETOUR

Since I spent a few weeks test-driving different taboulleh recipes, I figured I had to try the version at Le Pain Quotidien when I saw it on the menu. I knew from the description on the menu that it was a non-traditional preparation (quinoa instead of bulgur wheat, arugula instead of parsley, and avocados on the side). It was a very tasty and surprisingly filling lunch, but definitely a detour from what I was striving for.


TABOULLEH: TAKE THREE/VICTORY!

Taking my favorite elements of both recipes, I added more lemon, slightly less bulgur wheat, and more parsley. Over time, I learned how to chop a bit more efficiently and so now the preparation takes closer to 30 minutes. Here is my new taboulleh recipe:

Ingredients:

3/4 cup bulgur wheat
1 1/4 cup boiling water
3 lemons
1/4 cup olive oil
3 teaspoons sea salt
4 minced scallions (white and green parts)
1 bunch of fresh mint leaves
2 bunches of chopped flat-leaf parsley
2 cups cherry or grape tomatoes, cut in half

Directions:
Place the bulgur in a large bowl, pour in the boiling water, add juice from two lemons, olive oil, and 1 1/2 teaspoons of salt. Stir, and let stand at room temperature for an hour or more.

Add the parsley, mint, scallions and tomatoes. Add juice from third lemon and 1 1/2 teaspoons of salt: mix well. Cover and refrigerate. The flavor improves if the tabbouleh sits for a few hours. Tabbouleh will last for a few days in the refrigerator.

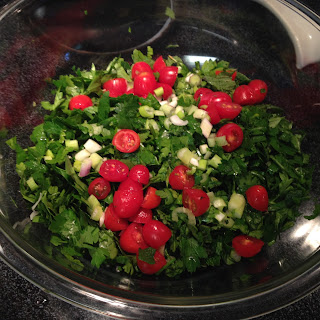
Parsley/mint/scallions/tomatoes, waiting for bulgur wheat to be added.


Yum!

I am happy to have discovered how to make my own favorite taboulleh recipe... And now I know firsthand that $7.95 is a bargain to pay for someone else to do all of the chopping!

-Ellyn

Friday, August 7, 2015

Lila's Piggy Cookies

Piggy-backing off of Ellyn's last post, Lila has also been getting creative in the kitchen. It seems that she has inherited my passion for baking and the best part of all-- decorating! When she's not watching funny cat videos on YouTube (an obsession of hers) she is researching cookie and cupcake decorating techniques.

Lila has observed me making creatively themed cupcakes for her birthday parties, but I don't think she's really been aware of the fact that her mommy had an eight-year stint as a cake decorator a long time ago, way before Lila was even thought of. I am never surprised by her artistic abilities because the arts run deep in our family, but I am tickled by the fact that she has expressed a specific interest in "food art." Although she has changed her career aspirations from chef to chemist (hey, I ain't mad at that!) baking is still one of her special hobbies. One of her favorite culinary creations to date has been her piggy cookies. Lila initiated the idea and made these herself with very little help from me. In fact, since we used pre-made sugar cookie dough, as her sous chef, all I did was put the cookies in the oven and take them out.

Here's what you need:

  • Your favorite sugar cookie recipe (or buy pre-made dough so that you can get to the fun part sooner)
  • Frosting with pink food coloring 
  • Mini marshmallows (to craft the ears and the nose)
  • Chocolate chips (for the eyes)
  • Cashews (for the smile)
Use your creativity to assemble these ingredients into cute pig faces. Store them in the fridge or freezer so that the frosting hardens. Enjoy! -Tara


Friday, July 24, 2015

Tell your kids to play with their food

Last month, a second grader surprised me with her baking skills. We were finishing a week-long summer program and planning our celebratory party. She offered to bring in brownies that she emphasized she would make entirely by herself. The next day, she proudly came into our class with 27 brownies carefully cut into generous squares. She emphasized that there were just enough for everyone to have one, and watched carefully to make sure that no one took an extra. I was impressed—not just by her organizational skills, but especially that she had baked a dessert all by herself.

Clara is just a year younger than this girl, and I questioned whether a year from now she would be volunteering to bake something all by herself. We are still at the stage of her helping out as sous chef or kitchen's assistant. She has never made an entire dish by herself. I know brownies are not the hardest dessert to prepare, but still this situation got me thinking about Clara and cooking. 

At the same time that I was thinking about Clara's culinary future, she received a hand-me-down copy of Strawberry Shortcake's book, Cooking Fun. This book from 1980 details ways to make a typical meal more interesting through food layout and design. Clara especially liked the Snakey Snack "recipe" (alternating slices of carrots and cucumber with cream cheese in between and arranging it to look like a snake). She was proud of herself when she made this mostly by herself for her friends when they came over for a playdate. Another favorite was Crackerwitch Castle (a tower of cheese and crackers).   


Clara was very happy to find a radish tail that worked perfectly as a
snake tongue.


Clara followed the directions to make Crackerwitch Castle and added her own embellishment with
cracked cracker topping and red pepper boats with carrots.


For any one who is looking for fun food ideas, this site has 60 ideas to get you started. I like their Loch Ness bagel monster and the Octopus' Garden. I'm not a fan of all of their recipes, though. The Banana Dogs look just wrong. I am lucky that Clara is a good eater, so I never had to trick her into eating her vegetables by making them look like something else. (But if she was a picky eater, I think I would go to Play with Your Food first for ideas! I love the way they give peppers and other veggies such a personality in these photos.)

Not all experiments have been a success. Clara's attempt at making the Octopus Garden resulted in a mishap when the pepper dipped a bit too far in the hummus.
I am not one of those moms who cuts out fancy shapes for my daughter's sandwiches every day or makes whipped cream smiley faces on her pancakes. I tend to have just enough energy to make sure she gets healthy snacks—slicing her apple into pieces rather than giving her a whole apple feels like an accomplishment. The only exception to the norm is on her birthday in which case I have been known to prepare cutesy presentations like butterfly sandwiches to please the birthday girl. However, I'm enjoying the delight in which Clara is expressing towards contributing to the cooking, even if at this point, she's mostly helping with the presentation rather than the actual food. 


Our next step is creating a meal together. It turns out we have a couple of other kid's cookbooks that I forgot we owned: Lidia Bastianich's Nonna's Birthday Surprise and The Silver Spoon for Children: Favorite Italian Recipes. Both of these books have real recipes like for Fish Kabobs and Pesto Spaghetti. Lidia's book is accompanied by drawings and a children's story that reinforces growing one's own food and making seasonal recipes. Another kid's cookbook that looks promising is Mollie Katzen's Pretend Soup. Katzen's Moosewood Cookbook was a classic in my house when I was a teeanger trying to experiment with vegetarian cooking. 


Yesterday, I read in the Motherlode blog on the New York Times site about a 9-year-old cooking Pasta with Tomato and Mushrooms and an 11-year-old making a fruit tart. I would love to help Clara develop the confidence and skills to try these recipes in a couple of years. The Times has been offering a series called "Kids in the Kitchen" where they share kid-friendly recipes. We definitely plan to put some of these on our list of recipes to try with Clara.

Clara has developed a curiosity about the kitchen and cooking through playing with her food. I encourage you to consider telling your kids to play with their food this summer and see what they create. 

-Ellyn

Friday, November 22, 2013

Sweet Potato Casserole for Thanksgiving

Most of the dishes at our Thanksgiving table are the traditional turkey, stuffing, mashed potatoes, orange-cranberry relish, and pumpkin bread recipes that have been passed down for generations. One of the newer additions to our family's table is this Sweet Potato Casserole recipe from my stepmother.

It is one of my favorites because the addition of the orange juice gives the sweet potatoes a sweet and tart flavor. I like that the potatoes aren't mashed in this recipe but have some firmness to them because they are layered in slices. I usually make this dish the night before Thanksgiving and refrigerate it overnight, and then bake it in the morning.

6 medium sweet potatoes
4 tablespoons butter
2/3 cup raisins
Pinch of salt
1 teaspoon cinnamon
2/3 cup maple syrup
4 tablespoons orange juice
1 cup mini marshmallows


Preheat oven to 350 degrees.

Boil sweet potatoes about 40 minutes until tender. When cooled, peel and cut into 1/2 inch slices. Place in dish and dot with butter and raisins. Top with salt, cinnamon, and syrup. 

Drizzle with juice and bake for about 30 minutes. Remove from oven, sprinkle marshmallows on top and bake for another 5 minutes until marshmallows have browned. 

Happy Thanksgiving to you and your families!


 -Ellyn

Friday, August 2, 2013

The Ten-Minute Tea Party

Deep down inside, I knew that my vision of a lingering, leisurely tea party with four five-year-olds and their American Girl Dolls might be a figment of my imagination. The first clue was that one of the girls still hadn’t taken her American Girl doll out of the box even though she had it for over a year.
Nonetheless, we persevered with the plan. Clara set the table with the big tea cups for the girls and toy cups for their dolls. We took out little plates and bowls for the sweet and savory snacks. Clara set up the silverware and the napkins. She even set up a little cup on the floor for her American Girl Doll’s doggy. 
The menu
Sweets menu
*Chocolate chip cookies
*Cherry pastries
*Fruit salad


Savory menu
*Annie’s organic snack mix

*Potato chips 

Drinks
*Iced herbal peach tea 

*Assorted juices


The dolls
Even though there are allegedly a thousand and three variations of the American Girl dolls, they all look rather the same to me with their bright, wide eyes and stiff yet slightly movable bodies. However, I was genuinely impressed with some of the accessories that the girls brought for their dolls.
Sarah’s doll had crutches, a tiny cast on her leg, and even a hearing aid. Lila’s doll rolled into the party on rollerblades, but Lila decided to take the shoes off before the tea party because she didn’t think they were appropriate footwear for the event.
 
Tea party rules
The girls reviewed what they know about how to conduct a tea party. 
 
1. It’s all in the pinky. Sarah started with the helpful reminder to keep one’s pinky properly flexed up in the air. Each girl practiced their pinky extension.
2. Proper etiquette. Lila reminded the group to be polite and put their napkins in their lap.
3. Tea mother. I shared with the girls my experience of going to a fancy high tea at the Empress in Victoria, Canada. Our waiter asked who would be the Tea mother and explained that that person’s job is to pour the tea for the others. Each girl took turns pouring the tea for the dolls.
4. Everything sounds better with an accent. I tried to get the girls to talk with a British accent, but since I can’t even do one myself, this tip didn’t go very far.
Gender roles
In the end, our tea party seemed to be shorter than even the underwater tea parties that Clara and I conduct in the swimming pool. The girls ate their snacks, drank their tea, and then they were eager to move on to other games.
Running around the house playing hide and seek, watching “Bedtime for Frances”, and reading books were more engaging for the girls than the tea party.
The old-fashioned pioneer woman in me was a bit disappointed that the tea party was not more of a hit. On the other hand, though, I am happy we are raising girls who find joy in play that transcends traditional gender roles, that it takes more than dolls and tea to satisfy these free spirits. 
-Ellyn

Friday, July 19, 2013

Unexpected Raspberries

I'm not saying I wished the raspberries into being. But, it sure felt like I did. 


A couple of weeks ago on Facebook, a friend posted an adorable photo of her daughter holding some freshly-picked raspberries from their backyard. 
 "Wow, those look delicious," I thought. "I wish we had a patch of raspberries in our backyard." 
The thing is, we do have a raspberry patch. However, for the past four years, whenever we looked at the raspberry patch, the raspberries were in various stages of not being ready to be eaten or just eaten by various wildlife. I think I have eaten a total of three raspberries from this bush in the past four years. 

Last week, I ventured out to the raspberries with tentative optimism, and I was amazed to see hundreds of ripe raspberries ready for the picking. I motioned Clara to come over with wild hand motions and a whispering voice as though if I talked too loudly the raspberries might disappear. It almost felt like they were a figment of my imagination. We spent half an hour eagerly filling up a colander with our discovery and the bounty was sufficient that we even left some ready raspberries on the bush for another day.


After washing our raspberries, my mind began to dance with raspberry recipes. I never had enough raspberries to actually make something with them in the past so this was a daunting but exciting thought. I went to my computer to research raspberry recipes, and about ten minutes later, Clara came into the room and asked sheepishly, "Is it OK if I ate them all?" I actually could not believe that she could eat that many raspberries in one short sitting, but sure enough, there were just six or seven lone raspberries hanging out at the bottom of the bowl.

Alas, my visions of making raspberry tarts, cobblers, and parfaits are on hold until the next berry picking adventure. However, I do have a favorite raspberry recipe that my dear cousin shared with me. It's better for the cooler months because you do have to turn on the oven, but it is amazingly easy and equally delicious.

Pear-Raspberry Tart

Source: Everyday Food, November 2012

  • prep 15 mins
  • total time 1 hour 15 mins
  • servings 6

INGREDIENTS

*1 sheet frozen puff pastry, thawed
(I recommend Dufour brand available at Whole Foods- decadent and unbelievably flaky. I heard that Trader Joe’s also makes a decent Puff Pastry.)
*2 tablespoons all-purpose flour, plus more for parchment
·  3/4 cup fresh or frozen raspberries (4 ounces)
·  1/4 cup sugar, plus more for sprinkling
·  2 teaspoons lemon juice
·  1/4 teaspoon fine salt
·  2 small firm, ripe pears, such as Bartlett or Anjou (3/4 pound total), peeled, cored, and cut into 1/2-inch slices
·  1 large egg white, lightly beaten

The first pear-raspberry tart I made a few months ago. The Dufour puff pastry crust was otherworldly.
 
Directions
1.     Step 1
Preheat oven to 400 degrees. Place puff pastry on a lightly floured parchment-lined baking sheet and gently stretch into a 9 1/2-inch square. With a paring knife, score pastry 3/4 inch from edges, creating a border. Freeze 10 minutes.
2.    Step 2
Stir together raspberries, sugar, lemon juice, flour, and salt. Lightly mash some berries to release juices and let stand 5 minutes. Very gently stir in pears. Spread evenly within border of pastry. Brush border with egg white and sprinkle with sugar.
3.    Step 3
Bake 15 minutes. Reduce temperature to 375 degrees and bake until juices are bubbling and crust is deep golden brown, about 30 minutes more (tent crust with foil if overbrowning). Dip a pastry brush in juices and glaze fruit. Let cool 15 minutes before serving (or let sit at room temperature, up to 8 hours).

May you find unexpected berries or other happy surprises wherever you roam this summer.

-Ellyn

Friday, June 7, 2013

National Donut Day!

For the most part, Lila and I are healthy eaters. We eat lots of fruit and veggies and avoid processed junk food. Our fridge is full of healthy, whole foods. Most cringe as we down green smoothies made with kale and spinach. Delish! 

But, we have a weakness... 

On occasion our morning commute includes a secret stop at D & D. Mommy orders a much-needed coffee and Lila orders a small selection of munchkins which are for her except for one that I always sneak for a taste. Fried flour and sugar-- why is it so perfectly good? So good, indeed, that there is a holiday to honor our donut delights! Today, June 7th, is National Donut Day. Yippee! 

In honor of National Donut Day, Dunkin' Donuts is giving out free donuts all day with the purchase of any drink. Feeling guilty about indulging? Entenmann's will donate a dollar to the Salvation Army for every "like" on their Facebook page. You see, celebrating National Donut Day is for a good cause.

Lila's favorite is jelly. Mine is glazed. Whatever is your favorite, enjoy! It's National Donut Day! We'll go back to eating healthy tomorrow. ;)


-Tara


Friday, April 5, 2013

Protein-Packed Chocolate Peanut Butter Muffins

Summer is coming which means I am hitting the gym a little harder. We all know that protein intake is an important part of a strength training and fitness routine. As a vegetarian and busy mom, I usually have to supplement my protein with whey or casien powder. At my last visit to the Vitamin Shoppe, I decided to try a different protein powder from my norm that was on sale- Cytosport Complete Casien in chocolate.

When I opened the tub and took out a scoop it instantly reminded me of chocolate cake mix. (Maybe because I'm dieting I have chocolate cake on the brain??) When I mixed it with water it was too thick and sweet for my taste. The baker in me decided it was time to experiment. The result is the recipe below. Chocolate Peanut Butter Muffins that are delicious and nutritious!

Ingredients:
  • 1 1/2 cups of whole wheat flour
  • 3 scoops of chocolate casien or whey
  • 4 tablespoons of cocoa powder
  • 1/4 cup of gound flax seed
  • 1/2 teaspoon of baking powder
  • 1/2 teaspoon of baking soda
  • 1 egg
  • 1/4 cup of plain yogurt
  • 1/2 cup of unsweetened apple sauce
  • 1/2 cup of creamy all natural peanut butter
  • Approximately 1 cup of skim milk (add until the cake mix is fully moistened)
  • A couple handfuls of mini dark chocolate chips
Directions:

Mix dry ingredients in a large bowl. Mix wet ingredients in a separate bowl (except the milk). Combine wet ingredients with the dry ingredients. Stir and add milk until the mix is fully moistened. Add chocolate chips. Grease muffin tins with cooking spray and spoon in batter. Bake at 350 for about 20 minutes. Makes about 20 muffins.

-Tara